镜像
主题
LEDE
更新源配置
腾讯
1
2
3
4
5
6
| src/gz openwrt_core https://mirrors.cloud.tencent.com/openwrt/releases/22.03.2/targets/x86/64/packages
src/gz openwrt_base https://mirrors.cloud.tencent.com/openwrt/releases/22.03.2/packages/x86_64/base
src/gz openwrt_luci https://mirrors.cloud.tencent.com/openwrt/releases/22.03.2/packages/x86_64/luci
src/gz openwrt_packages https://mirrors.cloud.tencent.com/openwrt/releases/22.03.2/packages/x86_64/packages
src/gz openwrt_routing https://mirrors.cloud.tencent.com/openwrt/releases/22.03.2/packages/x86_64/routing
src/gz openwrt_telephony https://mirrors.cloud.tencent.com/lede/snapshots/packages/x86_64/telephony
|
清华源
1
2
3
4
5
6
7
8
9
| src/gz openwrt_core https://mirrors.cloud.tencent.com/lede/snapshots/targets/x86/64/packages
src/gz openwrt_base https://mirrors.cloud.tencent.com/lede/snapshots/packages/x86_64/base
src/gz openwrt_helloworld https://mirrors.cloud.tencent.com/lede/snapshots/packages/x86_64/helloworld
src/gz openwrt_kenzo https://mirrors.cloud.tencent.com/lede/snapshots/packages/x86_64/kenzo
src/gz openwrt_luci https://mirrors.cloud.tencent.com/lede/releases/18.06.9/packages/x86_64/luci
src/gz openwrt_packages https://mirrors.cloud.tencent.com/lede/snapshots/packages/x86_64/packages
src/gz openwrt_routing https://mirrors.cloud.tencent.com/lede/snapshots/packages/x86_64/routing
src/gz openwrt_small https://mirrors.cloud.tencent.com/lede/snapshots/packages/x86_64/small
src/gz openwrt_telephony https://mirrors.cloud.tencent.com/lede/snapshots/packages/x86_64/telephony
|
PVE
查看 debian 版本
1
2
3
4
5
6
7
8
9
10
11
12
13
14
15
16
17
18
19
20
21
| # 1. 查看文件 release 文件
$ cat /etc/os-release
PRETTY_NAME="Debian GNU/Linux 11 (bullseye)"
NAME="Debian GNU/Linux"
VERSION_ID="11"
VERSION="11 (bullseye)"
VERSION_CODENAME=bullseye
ID=debian
HOME_URL="https://www.debian.org/"
SUPPORT_URL="https://www.debian.org/support"
BUG_REPORT_URL="https://bugs.debian.org/"
# 2. 通过 lsb-release 命令
$ apt update
$ apt install lsb-release
$ lsb_release -a
No LSB modules are available.
Distributor ID: Debian
Description: Debian GNU/Linux 11 (bullseye)
Release: 11
Codename: bullseye
|
修改 debian 更新源
参考这里。
1
2
3
4
5
6
7
8
9
10
11
12
13
14
15
16
| # 安装依赖
apt update
apt install apt-transport-https ca-certificates -y
# 修改源文件
$ mv /etc/apt/sources.list /etc/apt/sources.list.back
$ vi /etc/apt/sources.list
#
deb https://mirrors.tuna.tsinghua.edu.cn/debian/ bullseye main contrib non-free
deb-src https://mirrors.tuna.tsinghua.edu.cn/debian/ bullseye main contrib non-free
deb https://mirrors.tuna.tsinghua.edu.cn/debian/ bullseye-updates main contrib non-free
deb-src https://mirrors.tuna.tsinghua.edu.cn/debian/ bullseye-updates main contrib non-free
deb https://mirrors.tuna.tsinghua.edu.cn/debian/ bullseye-backports main contrib non-free
deb-src https://mirrors.tuna.tsinghua.edu.cn/debian/ bullseye-backports main contrib non-free
deb https://mirrors.tuna.tsinghua.edu.cn/debian-security bullseye-security main contrib non-free
deb-src https://mirrors.tuna.tsinghua.edu.cn/debian-security bullseye-security main contrib non-free
|
更新
1
2
| apt update
apt upgrade -y
|
修改更新源
参考这里。
proxmox 更新
1
2
3
4
| # 添加源文件
vi /etc/apt/sources.list.d/pve-no-subscription.list
# 输入 (注意 debian 版本)
deb https://mirrors.tuna.tsinghua.edu.cn/proxmox/debian bullseye pve-no-subscription
|
CT 模板加速
1
2
| cp /usr/share/perl5/PVE/APLInfo.pm /usr/share/perl5/PVE/APLInfo.pm_back
sed -i 's|http://download.proxmox.com|https://mirrors.tuna.tsinghua.edu.cn/proxmox|g' /usr/share/perl5/PVE/APLInfo.pm
|
重启生效。
从 qcow2 启动 openwrt
1. 拷贝镜像至 pve
1
| scp openwrt-x86-64-generic-squashfs-combined-efi.qcow2 root@192.168.6.60:
|
2. 创建虚拟机
不用添加硬盘盒配置 CD/DVD 驱动器。
3. 挂载镜像为磁盘
1
2
3
4
| # qcow2
qm importdisk 100 openwrt-x86-64-generic-squashfs-combined-efi.qcow2 local-lvm
# img
qm importdisk 100 openwrt-x86-64-generic-squashfs-combined-efi.img local-lvm
|
这里的 100 是虚拟机 ID
local-lvm 是存储池名称
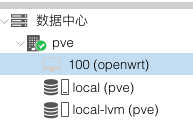
4. 为虚拟机添加硬盘
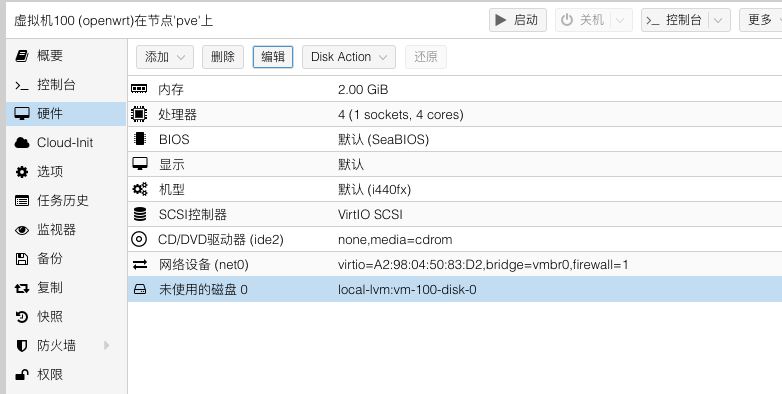
选中未使用的磁盘,并点击编辑。
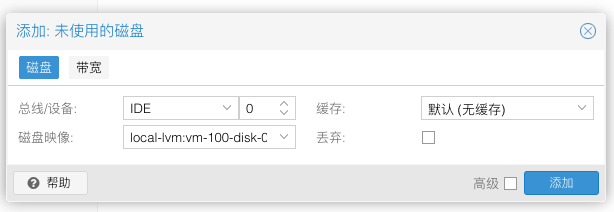
类型选择 IDE。
5. 修改引导
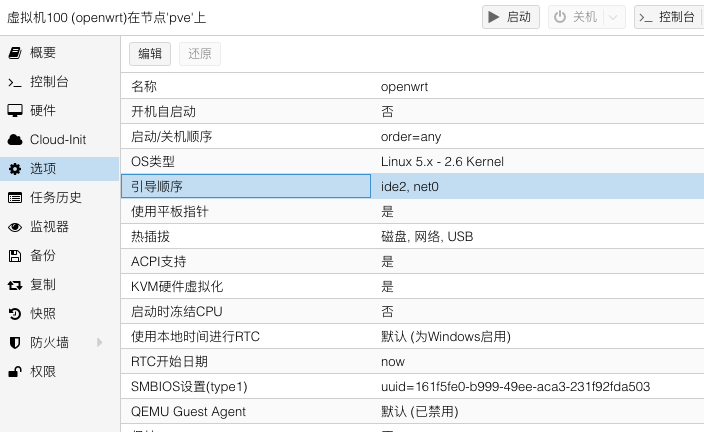
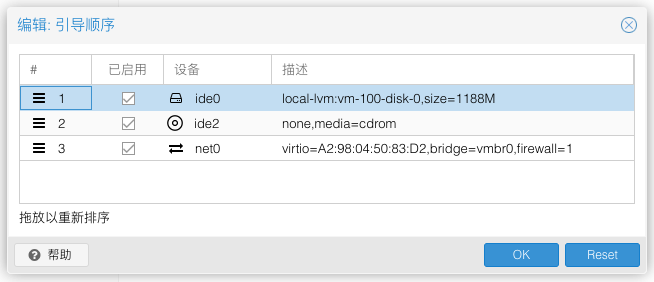
启用新添加的硬盘,并把优先级设为最高(拖动序号前的三条横杠)。
6. 启动虚拟机
保存上述更改,启动虚拟机即可。
硬盘直通
1
2
3
4
5
6
| $ vi /etc/default/grub
# 修改 GRUB_CMDLINE_LINUX_DEFAULT 为如下
GRUB_CMDLINE_LINUX_DEFAULT="quiet intel_iommu=on"
# 更新 grub
$ update-grub
|
修改网络地址
1
2
3
| $ vim /etc/config/network
# 修改对应的网络接口地址, 比如 eth0
$ /etc/init.d/network restart
|
修改密码
Openwrt
初始化
修改网络配置
/etc/config/network
1
2
| # interface 'lan'
option ipaddr ... # 修改这里
|
1
2
| $ service network reload
$ service network restart
|
修改密码
安装应用
1
2
3
| opkg install <package>
opkg install <package.ipk>
opkg install <http://path/to/package.ipk>
|
扩容 overlay
已验证的镜像类型
1
| openwrt-...-...-generic-squashfs-combined-efi.img
|
扩容
1
2
3
4
5
6
7
8
9
10
11
12
13
14
15
16
17
18
19
20
21
22
23
24
| # 扩容镜像
dd if=/dev/zero bs=1G count=30 >> openwrt-22.03.2-x86-64-generic-squashfs-combined-efi.img
# 分区
$ parted openwrt-22.03.2-x86-64-generic-squashfs-combined-efi.img
...
(parted) print
...
Number Start End Size File system Name Flags
128 17.4kB 262kB 245kB bios_grub
1 262kB 17.0MB 16.8MB fat16 legacy_boot
2 17.0MB 126MB 109MB
(parted) resizepart 2 100%
(parted) print
...
Number Start End Size File system Name Flags
128 17.4kB 262kB 245kB bios_grub
1 262kB 17.0MB 16.8MB fat16 legacy_boot
2 17.0MB 32.3GB 32.3GB
(parted) quit
# [pve] 加载镜像为虚拟机磁盘
qm importdisk 103 openwrt-22.03.2-x86-64-generic-squashfs-combined-efi.img local-lvm
|
旁路由
- 网络 / 接口 / LAN
- 基本设置
- ipv4 地址,修改为主路由局域网合法且未被占用地址(如 192.168.6.2~192.168.6.254)
- 网关,主路由 ip 地址(如 192.168.6.1)
- 广播地址,如 192.168.6.255
- DNS 服务器,主路由 ip 地址
- IPv6 分配长度,已禁用
- 高级设置
- 物理设置
- DHCP 服务器
- 网络 / 防火墙
- 运行 SSR
设备设置
Mac OS
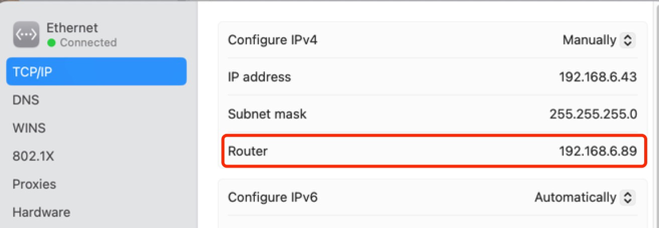
Ubuntu Server
1
2
3
4
5
6
7
8
9
10
11
12
13
14
15
16
17
18
19
| $ cat /etc/netplan/00-installer-config.yaml
# This is the network config written by 'subiquity'
network:
ethernets:
enp5s0:
dhcp4: false
addresses: [192.168.6.55/24]
match:
macaddress: 2a:04:a0:xx:xx:xx
wakeonlan: true
nameservers:
addresses: [223.6.6.6, 8.8.8.8]
routes:
- to: default
via: 192.168.6.89
metric: 40
enp6s0:
dhcp4: true
version: 2
|
连通性校验
- ping 使用 ICMP 协议,代理一般只支持 TCP 和 UDP,所以使用 ping 可能无法判断是否代理成功
1
2
| # 可以尝试下面命令
curl https://www.google.com
|
自定义规则
