kafka release notes

v2

  • 支持前缀ACLs

  • 添加认证框架(authenticate framework)

  • 支持主机名认证

  • 动态更新SSL信任库

  • 改进复制协议避免leader和follower间日志差异

  • 减少消息转换占用内存,提升broker弹性

  • 减少消息分块内存使用,避免broker的OutOfMemory错误

  • 在应用限流之前通知客户端,使得客户端在超过限额时,可以区分是网络错误还是限流

  • 增加消费者配置选项,避免无限阻塞

  • 放弃Java7

  • Kafka Connect改进

    • 改进transformations异常处理方式
    • 日志包含更多信息
    • 增加密钥从连接器配置中移除扩展
  • 增加Scala wrapper API

  • 支持消息头信息添加读取

  • Kafka Streams中的窗口聚合性能有大的提升

v1.1

  • Kafka Controller有大的改善

    • 加速controlled shutdown
    • 改善zookeeper会话过期处理
    • 允许单个集群支持更多分区
    • 引入了增量提取请求,当分区数量很大时提供更高效的复制
  • 增加对日志目录副本移动支持,以便于JBOD实现数据平衡

  • 动态更新某些broker配置

  • 增加代理令牌身份验证,以支持大量客户端导致的其他身份验证服务器过载

  • Kafka Connect功能更新

    • Connect REST接口中支持Header
    • SSL和kafka集群标识符
    • 连接器名称验证
    • 支持接收器主题正则表达式
    • 默认最大堆大小增加到2GB
  • Kafka Streams API改进

    • 减少重新分区主题占用的分区空间
    • 异常处理可定制
    • 增强broker弹性

v1.0

  • Streams API改进
    • 增加API在运行时公开活动任务的状态
    • 新的cogroup API可以更轻松地处理代码中包含更少StateStore和更少移动部件的分区聚合
  • 改进集群可监控性
  • 支持Java9
  • 区分身份验证错误和代理失败
  • 更好得容忍磁盘故障

0.11.0.0

  • 支持 Exactly-once 语义。为了支持幂等producer和EOS,增加一些与事务相关的字段,使得单个record数据结构体积增加。但因为优化了RecordBatch使得整个batch所占体积反而减少,进一步降低了网络IO开销。
  • 优化了对Snappy压缩的支持之前由于源代码中硬编码了blocksize
  • 消息增加头部信息(Header)Record增加了Header,每个header是一个KV存储
  • 空消费者组延时rebalance为了缩短多consumer首次rebalance的时间,增加了“group.initial.rebalance.delay.ms”用于设置group开启rebalance的延时时间。这段延时期间允许更多的consumer加入组,避免不必要的JoinGroup与SyncGroup之间的切换。当然凡事都是trade-off,引入这个必然带来消费延时。
  • 新的分配算法:StickyAssignor比range和round-robin更加平衡的分配算法。
  • 重构了controller,采用了单线程+基于事件队列的方式。

0.10.x

  • 内置了机架感知以便隔离副本,使得Kafka保证副本可以跨越到多个机架或者是可用区域,显著提高了Kafka的弹性和可用性

  • 所有Kafka中的消息都包含了时间戳字段,这个时间就是这条消息产生的时间。这使得Kafka Streams能够处理基于事件时间的流处理;而且那些通过时间寻找消息以及那些基于事件时间戳的垃圾回收特性能为可能。

  • Apache Kafka 0.9.0.0版本引入了新的安全特性,包括通过SASL支持Kerberos。Apache Kafka 0.10.0.0现在支持更多的SASL特性,包括外部授权服务器,在一台服务器上支持多种类型的SASL认证以及其他的改进。

  • Kafka Connect得到了持续提升。在此之前,用户需要监控日志以便看到各个connectors以及他们task的状态,现在Kafka已经支持了获取的状态API这样使得监控变得更简单。同时也添加了控制相关的API,这使得用户可以在进行维护的时候停止一个connector;或者手动地重启那些失败的task。这些能够直观的在用户界面展示和管理connector目前可以在控制中心(Control Center)看到。

  • Kafka Consumer Max Records,在Kafka 0.9.0.0,开发者们在新consumer上使用poll()函数的时候是几乎无法控制返回消息的条数。不过值得高兴的是,此版本的Kafka引入了max.poll.records参数,允许开发者控制返回消息的条数

  • 协议版本改进,Kafka brokers现在支持返回所有支持的协议版本的请求API,这个特点的好处就是以后将允许一个客户端支持多个broker版本。

kafka 架构

概念

基础

  • broker
  • topic
  • partition
  • segment
  • replication
  • consumer
    • consumer
    • consumer group
    • consumer instance
    • offset
  • producer

broker

broker 是一个 kafka 进程,多个 broker 组成了一个 kafka 集群。在 conumer 和 producer 中,使用如下方式指定多个 broker。

1
2
Properties props = new Properties();
props.put("bootstrap.servers", "localhost:9092,localhost:9093");

topics

主题,标识了一个消息队列。producer 产生数据时需要指定,consumer 消费时也需要指定,两者指定的 topic 匹配来达到数据的流通。

producer

生产者,产生消息的实例。producer 需要指定 topic,可选地将消息写入哪个 partition,通过指定 partitioner.class 选项实现。

1
2
3
4
5
6
7
8
9
10
11
Properties props = new Properties();
props.put("bootstrap.servers", "localhost:9092");
props.put("acks", "all");
props.put("retries", 0);
props.put("batch.size", 16384);
props.put("linger.ms", 1);
props.put("partitioner.class", "com.example.MyPartitioner");
props.put("buffer.memory", 33554432);
props.put("key.serializer", "org.apache.kafka.common.serialization.StringSerializer");
props.put("value.serializer", "org.apache.kafka.common.serialization.StringSerializer");
Producer<String, String> producer = new KafkaProducer<>(props);

consumer

consumer

消费者,逻辑概念,指从消息队列获取消息的实例。consumer 必须指定 topic,可选地指定 partition。

1
2
3
4
5
6
7
8
9
10
11
12
13
14
15
16
17
18
Properties props = new Properties();
props.setProperty("bootstrap.servers", "localhost:9092");
props.setProperty("group.id", "test-group");
props.setProperty("enable.auto.commit", "false");
props.setProperty("key.deserializer", "org.apache.kafka.common.serialization.StringDeserializer");
props.setProperty("value.deserializer", "org.apache.kafka.common.serialization.StringDeserializer");

KafkaConsumer<String, String> consumer = new KafkaConsumer<>(props);
//don't call consumer#subscribe()
//assigning partition-id=1
consumer.assign(Collections.singleton(new TopicPartition("topic", 1)));
while (true) {
ConsumerRecords<String, String> records = consumer.poll(Duration.ofSeconds(2));
for (ConsumerRecord<String, String> record : records) {
// todo sth.
}
consumer.commitSync(); // enable.auto.commit 设置为 false 时必须
}

consumer instance

consumer instance 是一个消费实例,具体地是某个程序的某个进程/线程。

consumer group

consumer group 是一个逻辑概念,由一个或多个 consumer instance 组成,这种组成是通过 consumer instance 消费时指定 cosumer group 来隐式加入的。

offset

offset 标记了一个 consumer group 消费消息的偏移量。偏移量信息保存在 zookeeper 中,保存的信息有过期时间,默认的过期时间在 kafka 的配置文件中,配置项为 offsets.retention.minutes,下面是一个示例。

1
2
# file: kafka/config/server.properties
offsets.retention.minutes=1440

默认的过期时间是 1440 分钟,即 24 小时。

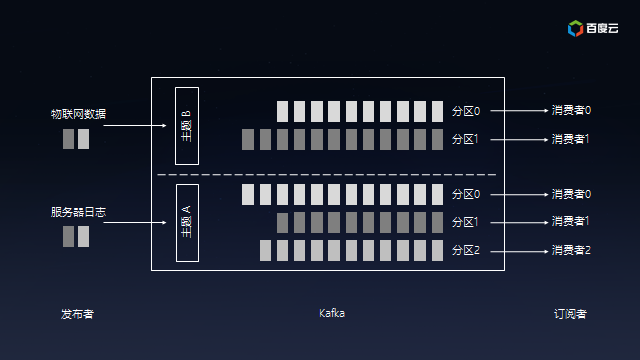
partition

分区(partition)是物理概念,topic 是逻辑概念,一个 topic 有至少一个 partition,每个 partition 会对应某个 broker 磁盘上的一些区域(更具体地,对应一个文件夹)。

可以将 topic 划分为多个分区,根据分区规则把消息存储到某个分区,如果分区规则能将消息均匀地分散到各 partition,这个过程就可以看做负载均衡和水平扩展。

同时,consumer 可以从一个或者多个 partition 中消费消息。

img

segment

segment 是 partition细分的物理概念,包括.index文件(索引文件)和.log文件(数据文件)。

replication

可以通过为 topic 设置多个 replication,来保证数据可靠性,多个 replication 是主从关系,主挂后,从从中选举新的主。

Kafka Stream

流处理拓扑

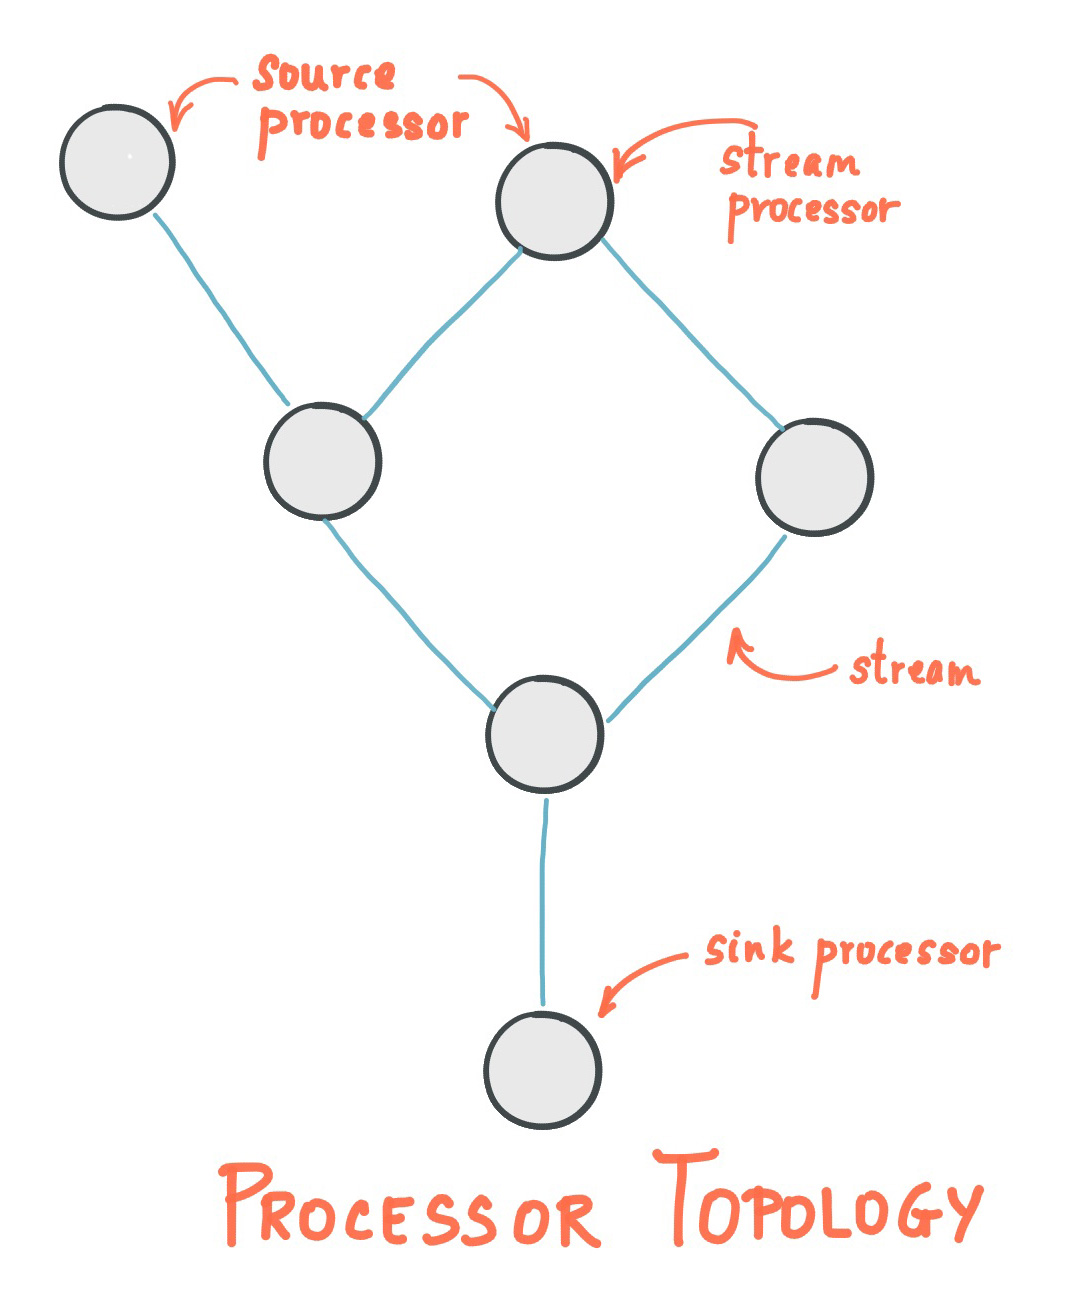
  • 流(Stream)代表一个无边界的、持续更新的数据集,是有序的、可重放的、不可变数据记录的容错序列,数据记录是一个键值对
  • 流处理应用(Stream Processing Application)是任何使用 Kafka Stream Library 的程序,通过一个或多个处理拓扑(Processor Topologies)定义计算逻辑,一个计算拓扑是一个流处理器(节点)的图,通过流(边)来连接
  • 流处理器(Stream Processor)是处理拓扑中的一个节点,表示一个数据转换的处理步骤,通过从拓扑中的上游节点接受一个输入记录,应用操作到记录,可能产生一个或多个记录到它的下游节点

拓扑中有两种特殊的处理器。

  • 源处理器(Source Processor),没有上游处理器,通过消费一个或多个 Kafka Topic ,向它所在的拓扑中构造一个输入流,将记录传递给下游节点
  • SinK 处理器(Sink Processor),没有下游处理器,发送所有从上游节点接受到的记录到指定的 Kafka Topic 内

在普通的处理器内,可以访问其他远程系统。

img

架构

Apache Kafka Architecture - Component Overview

参考

kafka for c++

  • reset offset

    1
    2
    3
    4
    5
    6
    7
    8
    9
    10
    11
    12
    13
    14
    15
    16
    17
    class ExampleRebalanceCb : public RdKafka::RebalanceCb {
    public:
    void rebalance_cb (RdKafka::KafkaConsumer *consumer,
    RdKafka::ErrorCode err,
    std::vector<RdKafka::TopicPartition*> &partitions) {
    if (err == RdKafka::ERR__ASSIGN_PARTITIONS) {
    RdKafka::TopicPartition *part;
    // find the partition, through std::find() or other means
    ...
    if (part)
    part->set_offset(1234);
    consumer->assign(partitions);
    } else {
    consumer->unassign();
    }
    }
    };

spring kafka

连接 Kafka

1
2
3
4
5
6
7
// 连接 kafka
@Bean
public KafkaAdmin admin() {
Map<String, Object> configs = new HashMap<>();
configs.put(AdminClientConfig.BOOTSTRAP_SERVERS_CONFIG, "127.0.0.1:9092");
return new KafkaAdmin(configs);
}

管理 Topic

1
2
3
4
5
6
7
8
@Bean
public NewTopic divinerInternalStrategyOperation() {
return TopicBuilder.name("example-topic")
.partitions(1)
.replicas(1)
.compact()
.build();
}

订阅 topic

1
2
3
4
@KafkaListener(id = "consumer-group", topics = "diviner_internal_strategy_operation")
public void listen(String in) {
// ...
}

发送消息

1
2
3
4
@Autowired
private KafkaTemplate<Object, Object> template;

template.send(key, value);

参考

MapR

Install

发行版支持矩阵参考这里

ubuntu cloud 18.04

MapR

1
2
# wget https://package.mapr.com/releases/installer/mapr-setup.sh -P /tmp
# sudo bash /tmp/mapr-setup.sh

登录

访问 https://<ip>:9443,注意是 https,chrome 不能访问的话换个浏览器。

image-20210826232821748

spring cacheable

说明

spring 提供了缓存功能,接下来完成一个示例,然后看下怎么不缓存空结果以及怎么写单测。

引入依赖

1
2
3
4
5
6
7
8
9
10
<dependency>
<groupId>org.springframework.boot</groupId>
<artifactId>spring-boot-starter-cache</artifactId>
<version>2.3.3.RELEASE</version>
</dependency>
<dependency>
<groupId>com.github.ben-manes.caffeine</groupId>
<artifactId>caffeine</artifactId>
<version>2.6.2</version>
</dependency>

编写代码

1
2
3
4
5
6
7
├── cache
│   ├── CacheableService.java
│   ├── CustomCacheManager.java
│   └── CustomKeyGenerator.java
├── controller
│   ├── CacheController.java
├── ...

CustomCacheManager.java

1
2
3
4
5
6
7
8
9
10
11
12
13
14
15
16
17
18
19
20
21
22
23
24
25
26
27
28
29
package pub.wii.cook.springboot.cache;

import com.github.benmanes.caffeine.cache.Caffeine;
import com.google.common.collect.Lists;
import org.springframework.cache.CacheManager;
import org.springframework.cache.annotation.EnableCaching;
import org.springframework.cache.caffeine.CaffeineCacheManager;
import org.springframework.context.annotation.Bean;
import org.springframework.context.annotation.Configuration;

import java.util.concurrent.TimeUnit;

@EnableCaching
@Configuration
public class CustomCacheManager {
private static final int CACHE_CAP = 100;
public static final String CACHE_NAME = "sample";

@Bean(name = CACHE_NAME)
CacheManager cacheManager() {
CaffeineCacheManager cm = new CaffeineCacheManager();
cm.setCaffeine(Caffeine.newBuilder().expireAfterAccess(1, TimeUnit.MINUTES)
.recordStats()
.initialCapacity(CACHE_CAP)
.maximumSize(CACHE_CAP));
cm.setCacheNames(Lists.newArrayList(CACHE_NAME));
return cm;
}
}

CustomKeyGenerator.java

1
2
3
4
5
6
7
8
9
10
11
12
13
14
15
16
package pub.wii.cook.springboot.cache;

import org.springframework.cache.interceptor.KeyGenerator;
import org.springframework.stereotype.Component;

import java.lang.reflect.Method;
import java.util.Arrays;

@Component
public class CustomKeyGenerator implements KeyGenerator {
@SuppressWarnings("NullableProblems")
@Override
public Object generate(Object o, Method method, Object... objects) {
return o.getClass().getSimpleName() + ":" + method.getName() + ":" + Arrays.toString(objects);
}
}

CacheableService.java

1
2
3
4
5
6
7
8
9
10
11
12
13
14
15
16
17
18
19
20
21
22
23
24
25
26
27
28
29
30
package pub.wii.cook.springboot.cache;

import org.springframework.cache.annotation.Cacheable;
import org.springframework.stereotype.Service;

import java.util.ArrayList;
import java.util.List;
import java.util.Random;
import java.util.UUID;

import static pub.wii.cook.springboot.cache.CustomCacheManager.CACHE_NAME;

@Service
public class CacheableService {
private static final Random random = new Random();

@Cacheable(
cacheManager = CACHE_NAME,
cacheNames = CACHE_NAME,
keyGenerator = "customKeyGenerator"
)
public List<Object> cache(String key) {
List<Object> res = new ArrayList<>();
int size = random.nextInt(10) + 1;
for (int i = 0; i < size; ++i) {
res.add(UUID.randomUUID().toString());
}
return res;
}
}

CacheController.java

1
2
3
4
5
6
7
8
9
10
11
12
13
14
15
16
17
18
19
20
21
22
23
24
25
package pub.wii.cook.springboot.controller;

import org.springframework.http.MediaType;
import org.springframework.http.ResponseEntity;
import org.springframework.web.bind.annotation.*;
import pub.wii.cook.springboot.cache.CacheableService;

import javax.annotation.Resource;
import java.util.List;

@RestController
@RequestMapping("cache")
public class CacheController {

@Resource
CacheableService cacheableService;

@RequestMapping(value = "get",
method = RequestMethod.GET,
produces = MediaType.APPLICATION_JSON_VALUE)
@ResponseBody
public ResponseEntity<List<Object>> get(@RequestParam("key") String key) {
return ResponseEntity.ok(cacheableService.cache(key));
}
}

示例

1
2
$ curl "http://localhost:8080/cache/get?key=wii"
["4b2dee35-781b-42cd-b594-8994025fa36e","6b4432c3-f16f-45c6-b56e-334054588a65","57b7f89a-8dd6-4500-98ab-b14973a88971"]

不缓存空结果

只需要在 @Cacheable 添加 unless = "#result == null or #result.size() == 0" 选项即可。

1
2
3
4
5
6
7
8
9
10
11
12
13
14
15
16
17
18
19
@Service
public class CacheableService {
private static final Random random = new Random();

@Cacheable(
cacheManager = CACHE_NAME,
cacheNames = CACHE_NAME,
keyGenerator = "customKeyGenerator",
unless = "#result == null or #result.size() == 0"
)
public List<Object> cache(String key) {
List<Object> res = new ArrayList<>();
int size = random.nextInt(10) + 1;
for (int i = 0; i < size; ++i) {
res.add(UUID.randomUUID().toString());
}
return res;
}
}

单测

相较于其他单测方式,直接测 Cache 内有没有缓存数据更直接。

CacheableServiceTest.java

1
2
3
4
5
6
7
8
9
10
11
12
13
14
15
16
17
18
19
20
21
22
23
24
25
26
27
28
29
30
31
32
33
34
35
36
37
38
39
40
41
42
43
44
45
46
47
48
49
50
51
52
53
54
55
56
57
58
59
60
61
62
63
64
65
66
67
68
69
70
71
72
73
74
75
76
77
78
79
80
81
82
83
84
85
86
87
88
89
90
91
92
93
94
95
96
97
98
99
100
101
102
103
104
105
106
107
108
109
110
111
112
113
114
115
package pub.wii.cook.springboot.cache;

import com.google.common.collect.Lists;
import lombok.SneakyThrows;
import org.junit.jupiter.api.Test;
import org.springframework.cache.Cache;
import org.springframework.cache.CacheManager;
import org.springframework.cache.annotation.Cacheable;
import org.springframework.cache.annotation.EnableCaching;
import org.springframework.cache.interceptor.KeyGenerator;
import org.springframework.context.annotation.Bean;
import org.springframework.context.annotation.Configuration;
import org.springframework.test.context.ContextConfiguration;
import org.springframework.test.context.junit.jupiter.SpringJUnitConfig;
import pub.wii.cook.springboot.config.CookSpringBootConfiguration;

import javax.annotation.Resource;

import java.util.ArrayList;
import java.util.List;

import static org.junit.jupiter.api.Assertions.*;
import static pub.wii.cook.springboot.cache.CustomCacheManager.CACHE_NAME;

@ContextConfiguration(classes = CookSpringBootConfiguration.class)
@SpringJUnitConfig(classes = CookSpringBootConfiguration.class)
class CacheableServiceTest {

interface ICache {
List<Integer> cacheWithEmpty(List<Integer> echo);

List<Integer> cacheWithoutEmpty(List<Integer> echo);
}

@Configuration
@EnableCaching
static class Config {
static class ICacheImpl implements ICache {

@Cacheable(
cacheManager = CACHE_NAME,
cacheNames = CACHE_NAME,
keyGenerator = "customKeyGenerator"
)
@Override
public List<Integer> cacheWithEmpty(List<Integer> echo) {
return echo;
}

@Cacheable(
cacheManager = CACHE_NAME,
cacheNames = CACHE_NAME,
keyGenerator = "customKeyGenerator",
unless = "#result == null or #result.size() == 0"
)
@Override
public List<Integer> cacheWithoutEmpty(List<Integer> echo) {
return echo;
}
}

@Bean
ICache iCache() {
return new ICacheImpl();
}
}

@Resource(name = CACHE_NAME)
CacheManager cacheManager;

@Resource
ICache iCache;

@SuppressWarnings("ConstantConditions")
@SneakyThrows
@Test
void cache() {
List<Integer> nonEmpty = Lists.newArrayList(1, 2, 3);
List<Integer> empty = new ArrayList<>();
List<Integer> nil = null;
Cache cache = cacheManager.getCache(CACHE_NAME);
KeyGenerator kg = new CustomKeyGenerator();
assertNotNull(cache);

iCache.cacheWithEmpty(nonEmpty);
iCache.cacheWithEmpty(empty);
iCache.cacheWithEmpty(nil);
iCache.cacheWithoutEmpty(nonEmpty);
iCache.cacheWithoutEmpty(empty);
iCache.cacheWithoutEmpty(nil);

assertEquals(cache.get(genKeyWithEmpty(kg, nonEmpty)).get(), nonEmpty);
assertEquals(cache.get(genKeyWithEmpty(kg, empty)).get(), empty);
assertEquals(cache.get(genKeyWithEmpty(kg, nil)).get(), nil);
assertEquals(cache.get(genKeyWithoutEmpty(kg, nonEmpty)).get(), nonEmpty);
assertEquals(cache.get(genKeyWithoutEmpty(kg, empty)), nil);
assertEquals(cache.get(genKeyWithoutEmpty(kg, nil)), nil);
}

@SneakyThrows
Object genKeyWithEmpty(KeyGenerator kg, List<Integer> arg) {
// 第一个参数不要用 iCache, iCache 是通过反射机制设置的对象, 有可能是一个 Proxy
// 获取 class name 的时候可能会得到奇怪的值, 导致 key 匹配不上
return kg.generate(new Config.ICacheImpl(),
ICache.class.getMethod("cacheWithEmpty", List.class), arg);
}

@SneakyThrows
Object genKeyWithoutEmpty(KeyGenerator kg, List<Integer> arg) {
// 第一个参数不要用 iCache, iCache 是通过反射机制设置的对象, 有可能是一个 Proxy
// 获取 class name 的时候可能会得到奇怪的值, 导致 key 匹配不上
return kg.generate(new Config.ICacheImpl(),
ICache.class.getMethod("cacheWithoutEmpty", List.class), arg);
}
}

CookSpringBootConfiguration.java

1
2
3
4
5
6
7
8
9
10
11
package pub.wii.cook.springboot.config;

import org.springframework.context.annotation.ComponentScan;
import org.springframework.context.annotation.EnableAspectJAutoProxy;
import org.springframework.context.annotation.aspectj.EnableSpringConfigured;

@EnableSpringConfigured
@EnableAspectJAutoProxy
@ComponentScan(basePackages = {"pub.wii.cook"}, lazyInit = true)
public class CookSpringBootConfiguration {
}

成长

经验之谈

  • 临渊羡鱼,不如退而结网
  • 凡事预则立,不预则废
  • 保持定力,一步一步慢慢来(尤其对于工作、长期目标)
  • 莫等闲,白了少年头,空悲切。岳飞 《满江红》

应该具备的能力

  • 保持身体健康的能力
  • 保持理性的能力
    • 保持心情愉悦的能力
      • 脱离消极、沮丧的能力
    • 保持独立思考的能力
      • 能清晰且辩证地了解自己的价值观
      • 有独处的能力
    • 保持积极乐观心态的能力
    • 学会接受那些接受不了、但又不得不接受的变故的能力
  • 保持感性的能力
    • 有感知被爱的能力
    • 有爱人的能力

TIPS

  • 道阻且长,行则必至

elastic search

安装

官网给了丰富的安装方式。

Centos 7

添加仓库

1
2
3
4
5
6
7
8
9
$ sudo vim /etc/yum.repos.d/elasticsearch.repo
[elasticsearch]
name=Elasticsearch repository for 7.x packages
baseurl=https://artifacts.elastic.co/packages/7.x/yum
gpgcheck=1
gpgkey=https://artifacts.elastic.co/GPG-KEY-elasticsearch
enabled=0
autorefresh=1
type=rpm-md

安装

1
$ sudo yum install --enablerepo=elasticsearch elasticsearch

systemd 配置

1
2
$ sudo systemctl daemon-reload
$ sudo systemctl enable elasticsearch.service

启动

1
sudo systemctl start elasticsearch.service

配置

添加用户

文档参考这里

对于使用 yum 在 centos 7 安装的 es 来说,可执行程序在 /usr/share/elasticsearch/bin 下。

1
2
3
4
5
6
7
8
9
10
# 命令格式
$ bin/elasticsearch-users
([useradd <username>] [-p <password>] [-r <roles>]) |
([list] <username>) |
([passwd <username>] [-p <password>]) |
([roles <username>] [-a <roles>] [-r <roles>]) |
([userdel <username>])

# 创建管理员
$ bin/elasticsearch-users useradd wii -p <password> -r superuser

角色 内置角色在这里

  • superuser : 管理员,所有权限

安装 Kibana

yum 安装

1
2
3
4
5
6
7
8
9
10
11
12
13
14
15
16
17
18
19
20
21
# install public signing key
$ rpm --import https://packages.elastic.co/GPG-KEY-elasticsearch

# 添加源
$ vim /etc/yum.repo.d/kibana.repo
[kibana-7.x]
name=Kibana repository for 7.x packages
baseurl=https://artifacts.elastic.co/packages/7.x/yum
gpgcheck=1
gpgkey=https://artifacts.elastic.co/GPG-KEY-elasticsearch
enabled=1
autorefresh=1
type=rpm-md

# 安装
$ yum install kibana
$ chkconfig --add kibana

# systemd
$ sudo /bin/systemctl daemon-reload
$ sudo /bin/systemctl enable kibana.service

启动 Kibana

1
$ sudo systemctl start kibana.service

配置

1
2
3
# file: /etc/kibana/kibana.yml
# 添加如下内容
server.host: "0.0.0.0"

访问

http://host:5601

使用

数据

工具

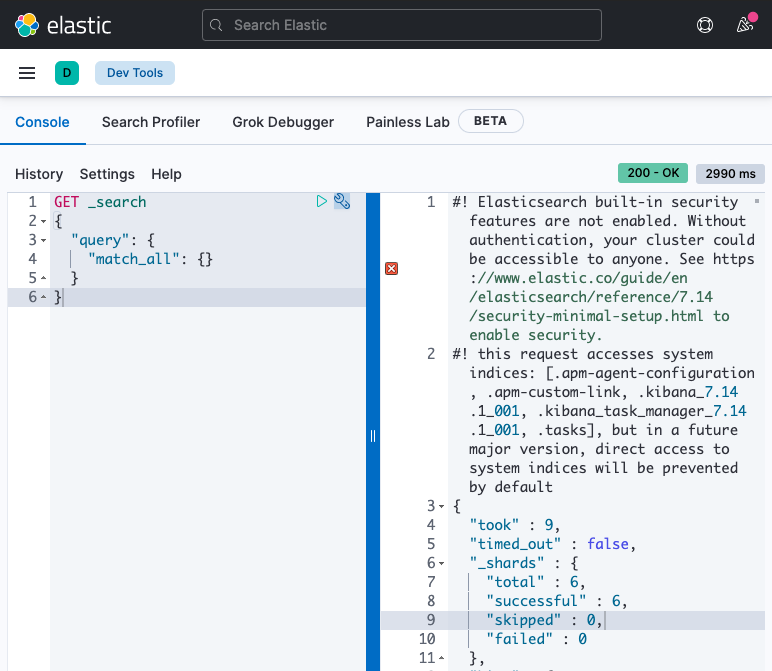
在 Kibana 首页,打开 Dev Tools,或者直接访问 http://host:5601/app/dev_tools#/console

image-20210922115803345

左侧为请求,右侧为响应。

请求的第一行,为请求方法及 URL,下方为数据

写入数据

查询

1
2
3
4
5
6
GET index_article/_search
{
"query": {
"match_all": {}
}
}

curl

参数

1
2
-X	指定请求方法
-H 添加 Header,添加多个可通过重复指定

示例

1
2
3
4
5
6
7
8
# 格式
curl [options] [URL...]

# 指定方法
curl -X POST [URL...]

# 添加 Header
curl -H "Content-Type: application/json" [URL...]