以一次 RPC 调用为线索,细究整个过程。
广告 - 报告
AppFlyer
研习录 - C++ 基础
关键词
virtual
-
作用
- 定义虚函数
- 仅定义未实现的函数为纯虚函数
- 有纯虚函数的类,叫抽象类,无法直接实例化
-
原理
- 虚函数是通过在类的虚函数表(vtable)中存储函数指针来实现的
- 编译器会为包含虚函数的类创建一个虚函数表和指向虚函数表的虚函数指针(vptr),虚函数表是一个指向虚函数的指针数组
- 每个定义虚函数的类都有自己的虚函数表,包含该类所定义的虚函数地址
- 当派生类重写(Override)基类的虚函数时,会在其自己的虚函数表中存储该虚函数的新地址,覆盖了基类虚函数表中相应位置的函数指针
- 每个派生类都有自己独立的虚函数表,其中存储着派生类覆盖(Override)或新增的虚函数的地址
- 当通过指向基类的指针或引用调用虚函数时,会通过虚函数指针查找对应的虚函数表完成调用,这个过程是在运行时动态决定的,被称为动态绑定
- 虚函数是通过在类的虚函数表(vtable)中存储函数指针来实现的
-
注意
- 基类不可以是虚函数,析构函数在有资源释放时必须是虚函数
- 虚函数通过查找虚函数表调用的,而虚函数是内存中的一片区域,需要先构造对象并创建内存空间,才能完成虚函数的调用,所以构造函数不能为虚函数
- 析构函数,在存在释放内存空间的代码时,必须设置为虚函数,负责会存在因虚构函数无法调用导致的内存泄露问题
- 基类不可以是虚函数,析构函数在有资源释放时必须是虚函数
volatile
提醒编译器使用 volatile 声明的变量随时可能改变,在编译期间不进行指令重排优化。C++ 标准保证 volatile 变量之间不会重排,不保证 volatile 和非 volatile 变量的重排优化。
此外,还有硬件级别的指令重排,volatile 无法保证。
内存
内存模型
内存管理
- 代码段
- 数据段
- 堆
- 栈
语言
四种强制转换
- static_cast
- 编译时期的静态类型检查
- 相当于C语⾔中的强制转换
- 不能实现普通指针数据(空指针除外)的强制转换
- ⼀般⽤于⽗类和⼦类指针、引⽤间的相互转换
- 没有运⾏时类型检查来保证转换的安全性
- dynamic_cast
- 运⾏时的检查
- 动态转换的类型和操作数必须是完整类类型或空指针、空引⽤
- const_cast
- 强制去掉不能被修改的常数特性
- reinterpret_cast
- 将指针或引⽤转换为⼀个⾜够⻓度的整型、将整型转换为指针或引⽤类型
1 | const_cast<std::string &>(service); // const std::string &service; |
GLIBC 每次内存分配都会进行系统调用吗
glibc 维护一个内存池,分配内存时优先从内存池获取,分配失败再向操作系统分配内存。
概念
- Chunk,glibc 对内存进行分配和管理的基本单元,chunk 是 glibc 维护的一块连续内存
- Arena,一组相关的内存 Chunk 的集合,glibc 使用多个 Arena 来管理内存分配,其中至少有一个主 Arena(main arena),还可以包括线程特定的 Arena(thread arena)。每个 Arena 都有自己的 Chunk 空闲链表和其他数据结构,用于记录已分配和空闲的内存块。
- Heap,是指进程可用的虚拟地址空间中用于动态内存分配的部分,Heap 由一系列的内存区域(region)组成,每个内存区域都是通过调用 brk 或 mmap 系统调用来获取
Heap 是进程可用的虚拟地址空间中的动态内存区域,Arena 是 Heap 内部的内存池,Chunk 是 Arena 中的内存分配单元。
获取内存的系统调用
- brk,通过调整堆的结束地址来分配和释放内存,对于小型内存分配比较高效
- mmap,通过请求操作系统分配新的虚拟内存区域,适合大块内存的分配
分配流程
- 线程首先需要获取一个 Arena。查找环形链表获取未加锁的 Arena,如果都已加锁则创建 Arena(总数有限制)
- 搜索 Chunk。尝试 fastbin 等机制,查找合适的 Chunk
- 创建 Chunk。如果未找到,则会调用 brk(主 Arena) 或 mmap(非主 Arena)向操作系统申请内存,扩充 Heap
- 分割 Chunk。对获取的 Chunk 按照用户需要的大小进行内存切分,并返回起始内存指针
- 内存对齐。glibc 确保返回的内存块满足特定的对齐要求
特殊函数
包含完整特殊函数的类
1 | class SampleClass { |
初始化列表
- 不能使用初始化列表来初始化 vector 的情况
- 当元素类型没有默认构造函数: 如果
std::vector的元素类型没有默认构造函数或者是不可复制的类型 - 当元素类型是有状态的: 如果
std::vector的元素类型是具有状态的类(即具有非平凡的构造函数和析构函数) - 当元素类型是引用类型:
std::vector不能持有引用类型的元素
- 当元素类型没有默认构造函数: 如果
示例
1 | void run { |
Trivially Copyable
trivially copyable 类型包括如下:
- 未加 const 或 volatile 修饰符(cv-unqualified)的标量类型(scalar type)
- 基本整型
- 浮点型
- 字符型
- 布尔型
- trivially copyable 对象类型(trivially copyable class),同时满足以下条件
- 没有非平凡(non-trivial)的拷贝构造函数
- 没有非平凡(non-trivial)的移动构造函数
- 没有非平凡(non-trivial)的复制赋值操作符
- 没有非平凡(non-trivial)的移动赋值操作符
- 有一个平凡的析构函数
- 上述类型的 arrays
- 上述类型的 cv-unqualified 类型
Lock Free
Lock Free 是一种并发编程的概念,用于描述一种编写多线程代码的技术或算法,该技术或算法在没有使用传统的互斥锁(mutex)机制的情况下实现了线程安全。
Memory Order
Memory Order(内存序)是用于指定原子操作和多线程间内存可见性的概念。
memory_order_relaxed: 最轻量级的内存序,没有任何同步或顺序要求,允许重排和乱序执行memory_order_acquire: 获取语意memory_order_release: 释放语意memory_order_acq_rel: 结合了memory_order_acquire和memory_order_release,同时有获取和释放的语义。适用于具有获取和释放语义的原子操作。memory_order_seq_cst: 最严格的内存序,提供全局顺序一致性。保证所有线程对原子操作的执行都具有相同的全局顺序
memory_order_consume 实现成本高,使用复杂,通常被
memory_order_acquire替代
Value Initialization
1 | // 变量定义, 但未初始化 |
以标量为例,未初始化的变量,其值是未定义的,具体行为取决于编译器。
STL
常见数据结构及底层实现
| 数据结构 | 底层实现 | 是否连续内存 | 备注 |
|---|---|---|---|
| vector | 数组 | 是 | |
| list | 双向链表 | 否 | |
| map / set | 红黑树 | 否 | 平衡树,更新后进行平衡 |
| unordered_map | 哈希表 | 否 |
容器
vector
1 | v.at(index); |
queue
1 | q.front(); |
stack
1 | s.top(); |
算法
sort
1 | std::vector<int> v1 = {1, 3, 2, 4, 6, 5}; |
thread
c++ thread
1 |
|
detach
1 | void payload() { |
注意
- 当进程退出时,操作系统会停掉所有由该进程创建的线程(detach 后也会被 kill)
c thread
1 | struct Arg { |
信号量
mutex & shared_mutex
1 | include "mutex" |
unique_lock & lock_guard
std::lock_guard 是一个轻量级的互斥锁封装,它提供了一种方便的方式来管理互斥锁的锁定和释放。std::unique_lock 是一个更加灵活和功能强大的互斥锁封装,提供了与 std::lock_guard 类似的锁定和释放互斥锁的功能,但还可以进行更多的操作。std::unique_lock 允许在构造函数中选择锁定模式,包括延迟锁定、递归锁定和尝试锁定等。
Tips
- 为什么 condition_variable 的 wait 方法使用 unique_lock
- lock_guard、scoped_lock 无法获取 mutex,unique_lock 可以
condition_variable
1 | // wait |
说明
- Predicate > mutex,即便获取信号量,不满足 Predicate,仍不退出 wait
- duration/time_point > Predicate,即时不满足 Predicate,到达指定时间限制,仍会退出 wait
示例
1 | using namespace std::literals; |
并发控制
- 互斥锁
- 读写锁
- atomic
- thread local
有哪些锁机制
| 锁 | 说明 | 备注 |
|---|---|---|
| std::mutex | 互斥锁 | |
| std::shared_mutex | 读写锁(共享互斥锁) | |
| std::recursive_mutex | 可重入锁(递归锁) | 需要程序确保每次上锁都会释放 |
| std::timed_mutex | 计时互斥锁 | |
| std::recursive_timed_mutex | 计时递归锁 | 需要程序确保每次上锁都会释放 |
如何实现自旋锁
可以通过原子操作和循环来实现自旋锁。
1 | include <atomic> |
atomic
std::atomic 提供了一种机制,使得多线程环境下对特定类型的变量进行原子操作成为可能。通过使用 std::atomic 创建的原子类型,我们可以确保在多线程环境中读写这些变量时,不会出现数据竞争的问题。这为并发编程提供了更高的可靠性和可预测性。
对于 atomic 模板类型,要求必须是 trivially-copyable,可以通过 std::is_trivially_copyable<T> 判断。
atomic<T>::is_lock_free
is_lock_free 用来检查特定类型的原子操作是否为无锁。
1 | // CASE 1 |
初始化
1 | std::atomic<int> a; |
赋值
1 | std::atomic<int> a; |
使用方式
- 对临界资源做竞争保护
- 创建对应类型的 atomic 变量
- 设置值
store- 赋值
exchangecompare_exchange_weakcompare_exchange_strong
- 使用
load或()操作符来获取值
协程(coroutines)
C++ 20 引入了协程,详见 cppreference - coroutines。在此之前的标准,可以通过 makecontext()/swapcontext() 来手动管理线程的 Context 切换,实现协程。或者使用其他库的实现,比如 boost::corountines 、brpc 等。
实现
- C++ 20
boost::corountines- bloomberg quantum 是一个可扩展的 C++ 协程框架
- 底层实现包含两个 thread pool
- Fiber Pool,运行协程任务的主线程池
- IO Thread Pool,运行 IO 任务的线程池
- 底层实现包含两个 thread pool
- libco ,腾讯开源的协程库,已许久未更新
- libaco
字符串
查找
1 | char *strchr(const char *string, int c); // NULL / 第一个位置 |
研习录 - 计算机科学
同步、异步、阻塞、非阻塞
在计算机编程中,同步、异步、阻塞和非阻塞是描述程序或进程之间交互方式的概念,它们的区别如下:
- 同步(Synchronous):同步指的是程序按照顺序依次执行,并且需要等待某个操作完成后才能继续执行下一步。调用者会主动等待被调用的操作完成,并获取结果后再进行下一步操作。
- 异步(Asynchronous):异步指的是程序的执行不会被阻塞,可以继续执行其他任务而无需等待某个操作完成。调用者发起一个操作后,不需要立即等待其完成,而是通过回调函数、事件通知等方式来处理操作完成后的结果。
- 阻塞(Blocking):阻塞指的是在执行某个操作时,调用者会被挂起并等待操作完成,无法进行其他任务。在阻塞模式下,调用者必须等待操作完成后才能继续执行。
- 非阻塞(Non-blocking):非阻塞指的是在执行某个操作时,调用者无论操作是否完成都不会被挂起,可以继续执行其他任务。在非阻塞模式下,调用者可以立即返回并继续执行其他操作,不需要等待操作的完成。
总结:
-
同步和异步关注的是程序执行的顺序和等待机制。
- 同步与异步着重点在消息通知的方式,也就是调用结果通知的方式
- 轮询 / 回调
- 同步与异步着重点在消息通知的方式,也就是调用结果通知的方式
-
阻塞和非阻塞关注的是程序在等待某个操作完成时是否会被挂起。
- 阻塞与非阻塞的着重点在于当前线程等待消息返回的行为
需要注意的是,同步和异步、阻塞和非阻塞并不是互斥的概念。一个操作可以是同步阻塞的,也可以是异步非阻塞的,具体取决于程序设计和所使用的接口或协议的特性。
研习录 - 计算机硬件
CPU

- CPU
- ALU(算术逻辑单元,Arithmetic Logic Unit ),执行所有的计算任务
- CU(控制单元,Control Unit),协助数据移动、解码执行
- 寄存器
- PC(程序计数器,Program Counter),保存 RAM 中的下一条指令的地址
- MAR(Memory Address Register),存储当前正在执行的指令的地址
- MDR(Memory Data Register),保存将要写到内存或从内存读取的数据
- CIR(Current Instruction Register),保存正在被解码和执行的实际指令
- ACC(Accumulator),保存计算结果
- 总线(Buses)
- Address Bus,传送指令或数据的地址
- Data Bus,在处理器和内存间传送数据
- Control Bus,传送控制信号(比如读内存、写内存)
研习录 - 操作系统
概念
- 字大小(word size)
- 在计算中,字是特定处理器设计使用的自然数据单位,是由处理器的指令集或硬件作为一个单元处理的固定大小的数据
- 通常是计算机处理器在一个时钟内处理二进制数据的位数,是处理器的寻址能力和数据操作单位的大小
内存
内存对齐
现代处理器的内存子系统仅限以字大小(word size)的粒度和对齐的方式访问内存,内存对齐是指数据在内存中存放时,起始位置是某个数值的倍数,这个倍数通常是计算机的字大小。
内存对齐的目的是提高计算机系统访问数据的效率,减少访问内存的次数。当访问未对齐的内存数据且数据横跨两个计算机可以读取的字时,需要访问两次内存并做额外的 shift 操作才能读取到完整的数据。
1 |
|
输出如下。
1 | 1 8 |
内存屏障
写屏障(Store Barrier)、读屏障(Load Barrier)和全屏障(Full Barrier)。
- 防止指令之间的重排序
- 保证数据的可见性
进程、线程、协程
操作系统由用户态切换至内核态的过程
- 触发事件
- 系统调用(new/delete、wait/sleep、创建线程等)、异常(InterruptedException)、外围设备中断
- 处理器将系统调用号和参数放到寄存器,触发执行中断指令(现代操作系统每个线程对应一个内核调度实体,不会阻塞整个应用程序)
- 异常/中断处理
- CPU 暂停处理线程的正常处理,转而执行预定义的异常或中断处理程序
- 保存上下文
- 把寄存器状态和指令指针保存到内存
- 切换到内核态
- 在异常/中断处理程序中,处理器会将当前执行模式从用户态切换为内核态(修改处理器的特殊寄存器或标志位,使其处于内核特权级别)
- 执行内核代码
- 从寄存器取出系统调用号及参数,执行操作系统函数
- 恢复上下文
- 将应用程序的上下文从保存的位置恢复回处理器寄存器中
- 切换到用户态
- 处理器将执行模式从内核态切换回用户态,并从中断/异常处理程序返回到应用程序的正常执行位置
并发控制
- 信号量
- 锁(读写锁、互斥锁、自旋锁)
- 自旋锁,盲等锁的机制,不放弃 CPU 使用权
- 可重入锁,同一进程可对同一资源重复上锁
- 乐观锁,假定每次读取写入的过程中不会有其他线程修改资源,每次读时不上锁,在写时判断是否被更改
- 悲观锁,假定每次读取后,在写入时资源都会被其他线程修改,每次读时都上锁
CUDA
TODO
- 内存模型
- 寄存器
- 共享内存
- 常量内存
- 全局内存
- 缓存
- 同步(block 内线程同步等)
- 待整理
- 内存占用(寄存器、共享内存)对并行性的影响
- 设备信息(缓存、寄存器等信息)
- SM 最大驻留线程束
- SM 占有率
硬件
CPU & GPU

内存
内存分级。
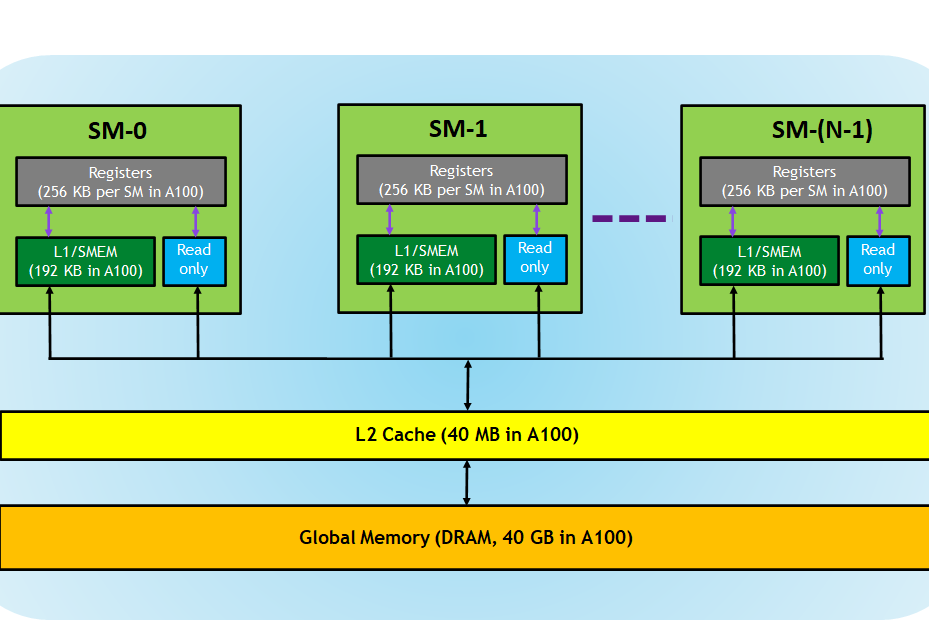
Nvidia GPU 架构
层级

参考 GPU Performance Background User’s Guide,NVIDIA Hopper Architecture In-Depth。
SM(Streaming Multiprocessor)

每个 SM 都有自己的指令调度器和各种指令执行管道。乘加是现代神经网络中最常见的运算,充当全连接层和卷积层的构建块,这两个层都可以被视为向量点积的集合。下表显示了 NVIDIA 最新 GPU 架构上各种数据类型的单个 SM 每个时钟的乘加运算。每个乘加都包含两个运算,因此可以将表中的吞吐量乘以 2,以获得每个时钟的 FLOP 计数。要获得 GPU 的 FLOPS 速率,需要将其乘以 SM 数量和 SM 时钟速率。例如,具有 108 个 SM 和 1.41 GHz 时钟频率的 A100 GPU 的峰值密集吞吐量为 156 TF32 TFLOPS 和 312 FP16 TFLOPS(应用程序实现的吞吐量取决于本文档中讨论的许多因素)。
核函数
定义
1 | __global__ void function_name(...) { |
__global__限定词- 返回值必须是
void
特性
- 核函数在 GPU 上并行执行
- 核函数只能访问 GPU 内存
- 核函数不能使用变长参数
- 核函数不能使用静态变量
- 核函数不能使用函数指针
- 核函数具有异步性
- 使用
cudaDeviceSynchronize()来做同步
- 使用
- 核函数不支持 iostream,打印需要使用 printf
核函数和线程等级
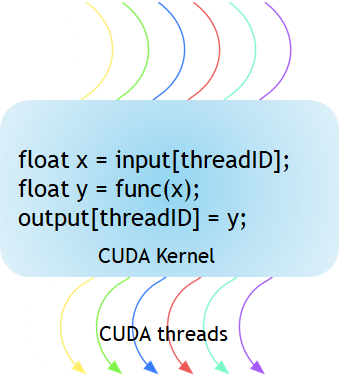
核(Kernel)是执行在 GPU 上的函数。应用程序的并行部分由K个不同的CUDA线程并行执行K次,而不是像常规的C/C++函数那样只执行一次。
每个CUDA内核都有一个__global__声明说明符。程序员通过使用内置变量为每个线程提供一个唯一的全局ID。

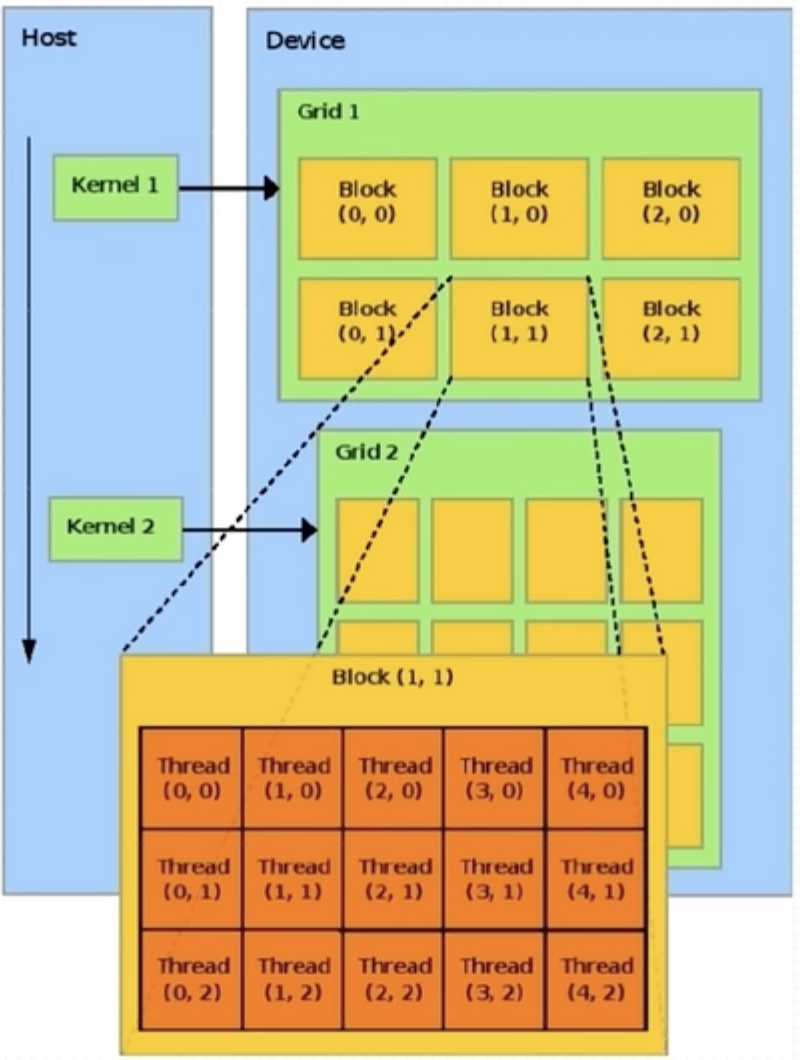
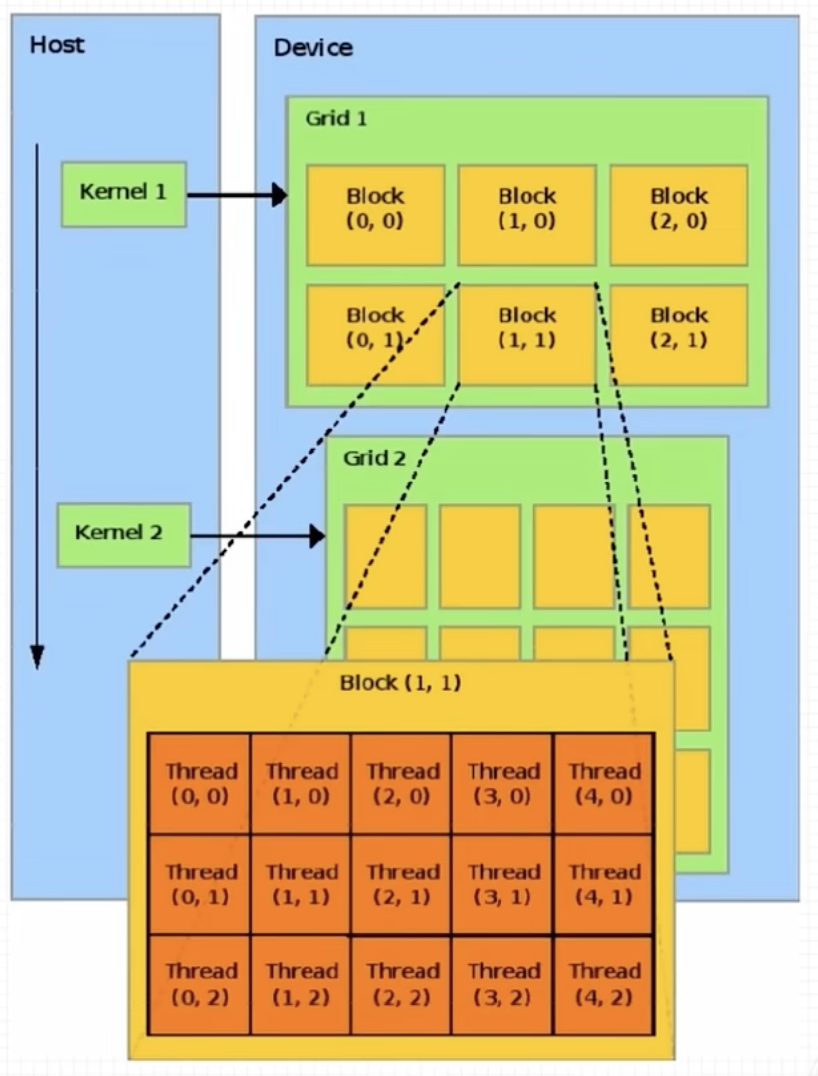
一组线程称为CUDA块(CUDA Block)。CUDA块被分组到一个网格(Grid)中。内核(Kernel)作为线程块网格(A Grid of Blocks of Threads)执行。
每个 CUDA 块被一个流式多处理器(Streaming Multiprocessor,SM)执行,不能被迁移到其他 SMs 处理(抢占、调试、CUDA动态并行期除外)。一个SM可以运行多个并发CUDA块,具体取决于CUDA块所需的资源。每个内核在一个设备上执行,CUDA支持一次在一个设备上运行多个内核。
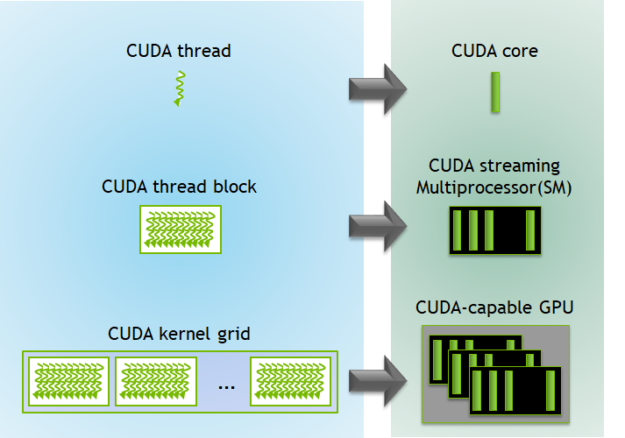
上图展示了内核执行和GPU中可用硬件资源的映射。
限制。
- CUDA架构限制每个块的线程数(每个块限制1024个线程)
- 线程块的维度可以通过内置的block Dim变量在内核中访问
- 块中的所有线程都可以使用内部函数
__syncthreads进行同步。使用__syncthreads块中的所有线程都必须等待 <<<…>>>语法中指定的每个块的线程数和每个网格的块数可以是int或dim3类型。这些三尖括号标记从主机代码到设备代码的调用。它也称为 Kernel Launch
示例。
1 | // Kernel - Adding two matrices MatA and MatB |
CUDA为线程和块定义了内置的3D变量。线程使用内置的3D变量threadIdx进行索引。三维索引提供了一种自然的方式来索引向量、矩阵和体积中的元素,并使CUDA编程更容易。类似地,块也使用称为block Idx的内置3D变量进行索引。示例的 CUDA 程序用于两个矩阵相加,显示了多维 blockIdx 和 threadIdx 以及其他变量(如 blockDim)。选择 2D 块是为了便于索引,每个块有 256 个线程,其中 x 和 y 方向各有 16 个线程。使用数据大小除以每个块的大小来计算块的总数。
调用
核函数调用需要指定线程模型。
1 | kernel_function<<<grid, block>>>(); |
线程模型
-
重要概念
-
grid,网格
-
block,线程块
-
-
配置线程
<<<grid_size, block_size>>> -
最大允许线程块大小 1024
-
最大允许网格大小 2^32 - 1
-
每个线程在核函数中都有一个唯一标识
-
内建变量(build-in variable)
- 每个线程的唯一标识由
<<<grid_size, block_size>>>确定,grid_size、block_size 保存在内建变量(build-in variable)- gridDim.x,该变量的值等于执行配置中变量 grid_size 的值
- blockDim.x,该变量的值等于执行配置中变量 block_size 的值
- 线程索引保存在内建变量
- blockIdx.x,该变量保存一个线程块在一个网格中的索引,范围是
[0, gridDim.x) - threadIdx.x,该变量保存一个线程在线程块中的索引,范围是
[0, blockDim.x)
- blockIdx.x,该变量保存一个线程块在一个网格中的索引,范围是
- 每个线程的唯一标识由
-
多维线程
- CUDA 可以组织三维的网格和线程块
- blockIdx 和 threadIdx 是类型为 uint3 的变量,该类型是结构体,有 x、y、z 三个变量
- gridDim 和 blockDim 是类型为 dim3 的变量,该类型是结构体,有 x、y、z 三个变量
- 多维网格和多维线程块本质上是一维的,GPU 物理上不分块
- 数量限制
- 网格大小
- gridDim.x,
[1, 2^31) - gridDim.y,
[1, 2^16) - gridDim.z,
[1, 2^16)
- gridDim.x,
- 线程块
- blockDim.x,1024
- blockDim.y,1024
- blockDim.z,64
- 网格大小
- 定义
1 | dim3 grid_size(g_x, g_y, g_z); |
nvcc 编译流程
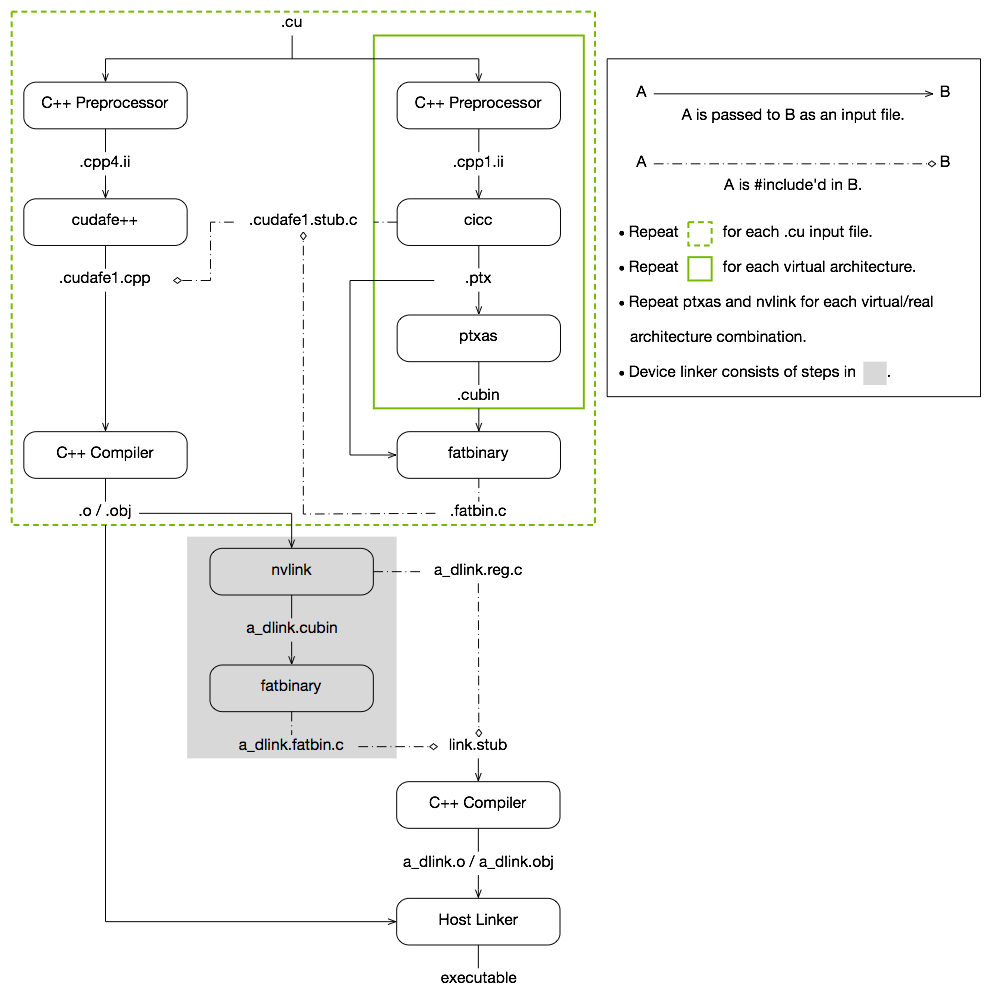
- nvcc 分离源代码为
- 主机(Host,
__host__)代码 - 设备(Device,
__global__)代码
- 主机(Host,
- 主机代码是 C/C++ 语法,设备代码是 C/C++ 扩展语言
- nvcc 先将设备代码编译为 PTX(Parallel Thread Execution)伪汇编语言,再将 PTX 代码编译为二进制的 cubin 目标代码
- 编译 PTX 时,需要指定
-arch=compute_XY选项,指定虚拟架构的计算能力,用于确定代码中能够使用的 CUDA 功能 - 编译 cubin 时,需要指定
-code=sm_ZW选项,指定一个真实架构的计算能力,用以确定可执行文件能够使用的 GPU
- 编译 PTX 时,需要指定
- PTX
- PTX 是 CUDA 平台为基于 GPU 的通用计算而定义的虚拟机和指令集
- nvcc 编译命令总是使用两个体系结构
- 一个是虚拟的中间体系结构
- 另一个是实际的 GPU 体系结构
- 虚拟架构更像是对应用所需的 GPU 功能的声明
- 兼容性
- 虚拟架构应该尽可能选择低版本,适配更多实际 GPU
- 实际架构应该尽可能选择高版本,充分发挥 GPU 性能
参考文档。
运行
步骤
- 设置 GPU 设备
- 使用
cudaGetDeviceCount可以获取 GPU 设备数量 - 使用
cudaSetDevice来设置使用的设备
- 使用
- 分配主机和设备内存
- 初始化主机中的数据
- 从主机复制数据到设备
- 调用核函数在设备中运行
- 将计算得到的数据从设备传给主机
- 释放主机与设备内存
内存
内存模型

基于 <<<grid, block>>> 的 cuda 程序内存模型。内存可见性及生命周期如下。

内存管理
- 内存分配,
cudaMalloc,对应标准库malloc- 运行环境:设备、主机
- 数据传递,
cudaMemcpy,对应标准库memcpy- 支持主机->主机、主机->设备、设备->设备、设备->主机 的内存拷贝,支持默认选项自动识别
- 运行环境:主机
- 内存初始化,
memset,对应标准库cudaMemset- 运行环境:主机
- 内存释放,
cudaFree,对应标准库free- 运行环境:主机、设备
函数
- 设备函数(
__device__修饰)- 只能运行在 GPU 设备上
- 设备函数只能被核函数和其他设备函数调用
- 核函数(
__global__修饰)- 一般由主机调用,在设备中执行
__global__修饰符不能和__host__、__device__同时用
- 主机函数(
__host__修饰或无修饰)- 主机端 C++ 函数
说明
- 可以使用
__host__和__device__同时修饰一个函数来减少冗余,编译器会针对主机和设备分别编译
参考
CUDA - 版本及环境搭建
CUDA (Compute Unified Device Architecture)是英伟达开发的并行计算平台,为使用 GPU 加速的程序提供开发环境(当前仅针对英伟达设备)。
API
CUDA 提供两层 API,驱动(Driver) API 及运行时(Runtime) API。Runtime API 是基于 Driver API 编写的、使用更为简便的 API。
Compute Capability
英伟达每款 GPU 会有一个叫做 Compute Capability 的版本号,用于标识设备的计算平台兼容性。其直译 计算能力 略有歧义,并非代表设备的计算性能。
rapidjson - usage
加载
从字符串加载
1 |
|
Type
1 | kNullType = 0, //!< null |
Object
读
1 | // 查找元素 |
Array
读
1 | // 判断是否为空 |
Value
创建
1 | // Object Value |