参数
| 参数 |
默认值 |
说明 |
| -XX:MaxDirectMemorySize |
64M |
非堆内存大小 |
GC
G1GC
G1GC是区域化、分代式垃圾回收器。堆内存被划分为大小相同的若干区域(Region),区域大小取值为[1,32]之间2的幂,若不配置Region大小,JVM以数量不超过2048个区域为目标,确定Region大小。这些Region逻辑上组合成传统的Eden、Survivor、Tenured。
概念
- Region:对内存块,逻辑组合为传统的年轻代、老年代
- CSet:回收集
- RSet:记忆集
- SATB: Snapshot-At-The-Beginning,初始快照
- IHOP:Initiating Heap Occupancy Percent
分区

阶段
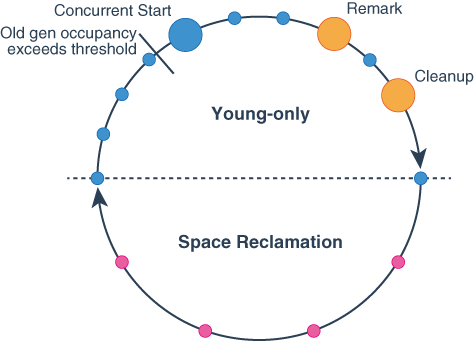
G1GC在两个阶段之间交替,young-only和space-reclamation。young-only 阶段包括垃圾回收,其逐渐将
Young-only 阶段
该阶段开始是一些普通年轻代回收(Normal yount collection),其将对象晋升至老年代。Young-only向Space-reclamatioin阶段过渡始自老年代使用率达到设定阈值。此时,G1执行**并行开始年轻代回收(Concurrent Start young collection)**替代普通年轻代回收。过渡周期包含以下阶段。
- Concurrent Start:除了执行普通年轻代回收,同时开始标记过程(marking process)。并行标记决定老年代区域中(old generation regions)所有当前可达对象,在接下来的space-reclamation阶段被保留。当回收标记还未完成时,可能会进行普通年轻代回收。标记完成伴随两个STW阶段:Remark和Cleanup。
- Remark:完成标记本身、执行全局引用处理、类卸载、回收空区域、清理内部数据结构。在Remark和Cleanup之间,G1会计算信息,以便后面能够在选中的老年代区域中并发回收可用空间,该过程在Cleanup阶段完成。
- Cleanup:决定是否将实际执行space-reclamation阶段。如果随后进行space-reclamation阶段,young-only阶段以单个就绪混合年轻代回收(Prepare Mixed young collection)结束。
Space-reclamation 阶段
该阶段包含多个混合回收,除了年轻代区域外,还会压缩(evacuate)老年代区域集合中的存活对象。当G1确定压缩更多老年代区域不会产生足够值得努力的空间时,space-reclamation阶段结束。
细节
确定初始堆占用率
初始堆占用率(Initiating Heap Occupancy Percent,IHOP)是触发初始标记回收的阈值,定义为老年代大小的百分比。
默认情况下,G1通过观察标记耗时及标记周期内老年代分配内存,自动决定最佳的IHOP。该特性称为Adaptive IHOP,当该特性激活时,参数-XX:InitiatingHeapOccupancyPercent指定的值作为,G1在还没有足够观察值确定该值时的初始值。通过参数-XX:-G1UseAdaptiveIHOP可关闭该特性,此时 -XX:InitiatingHeapOccupancyPercent 参数指定的值总是决定该阈值。
标记
G1标记使用初始快照算法(Snapshot-At-The-Beginning,SATB)。在初始标记暂停时(Initial Mark pause),为堆创建虚拟快照,
参数
| 参数 |
默认值 |
说明 |
| -XX:+UseG1GC |
- |
使用G1回收器 |
| -XX:MaxGCPauseMillis |
200 |
最大GC停顿时间,单位毫秒 |
| -XX:InitiatingHeapOccupancyPercent |
45 |
触发标记周期的堆占用率阈值 |
| -XX:NewRatio |
2 |
新生代与老年代大小比例 |
| -XX:SurvivorRatio |
8 |
eden与suvivor区大小比例 |
| -XX:MaxTenuringThreshold |
15 |
提升年老代的最大临界值 |
| -XX:ParallelGCThreads |
- |
STW工作线程数 |
| -XX:ConcGCThreads |
- |
并行标记线程数 |
| -XX:G1ReservePercent |
10 |
空闲空间的预留内存百分比 |
| -XX:G1HeapWastePercent |
10 |
触发混合垃圾回收的可回收堆内存阈值 |
| -XX:G1HeapRegionSize |
- |
region分片size,1M~32M,2的幂 |
| -XX:G1MixedGCCountTarget |
8 |
|
| -XX:G1OldCSetRegionThresholdPercent |
10 |
|
| -XX:-G1UseAdaptiveIHOP |
- |
关闭自动设置IHOP特性 |
实验参数
使用实验参数,需要添加解锁实验参数标记。
| 参数 |
默认值 |
说明 |
| -XX:+UnlockExperimentalVMOptions |
- |
解锁实验参数 |
| -XX:G1NewSizePercent |
5 |
年轻代最小百分比 |
| -XX:G1MaxNewSizePercent=60 |
60 |
年轻代最大百分比 |
| -XX:G1MixedGCLiveThresholdPercent |
65 |
混合垃圾回收周期中要包括的老年代region使用率阈值 |
日志
| 参数 |
说明 |
| -verbose:gc |
- |
| -XX:+PrintGCDetails |
- |
| -XX:+PrintGCDateStamps |
- |
| -XX:+PrintGCApplicationStoppedTime |
打印应用停留时间 |
| -XX:+PrintTenuringDistribution |
老年代分布 |
| -Xloggc:/path/to/gc.log |
- |
| -XX:+UseGCLogFileRotation |
- |
| -XX:NumberOfGCLogFiles=10 |
- |
| -XX:GCLogFileSize=128M |
- |
注意
- G1触发Full GC,退化使用Serial收集完成垃圾回收,仅适用单线程
- 避免使用 -Xmn或 -XX:NewRatio 显示设置年轻代大小,会覆盖期望STW时间设置
- 优先调优项
-XX:InitiatingHeapOccupancyPercent-XX:G1MixedGCLiveThresholdPercent-XX:G1HeapWastePercent-XX:G1MixedGCCountTarget-XX:G1OldCSetRegionThresholdPercent
参考